

V Kandinsky's Swinging Schaukeln 1925
VI Monet's Waterlilies
VII. Norbert Goenuette's The Boulevard de Clichy under Snow, 1875/6
VIII Hans Holbein the Younger's A Lady with a Squirrel and a Starling, around 1526-8


VI Monet's Waterlilies
VII. Norbert Goenuette's The Boulevard de Clichy under Snow, 1875/6
VIII Hans Holbein the Younger's A Lady with a Squirrel and a Starling, around 1526-8
August Macke
August Macke was born on 3rd January 1887 in Meschede, Germany. He studied at the Düsseldorf Academy of Arts from 1904 to 1906, and shortly afterwards began to take a series of trips to Paris, where he was greatly influenced by the Impressionist movement. In 1909 he met Henri Matisse and was introduced to Fauvism (named from the French word fauves meaning wild beasts) so called because of their wild use of colour. Macke began to use vibrant colours and bold brushstrokes in his work, and when he met the Expressionist painter Franz Marc they became firm friends, building on their shared joy of colour, and developing abstract ideas. While Marc painted animals, Macke concentrated on the landscape around him and the people that inhabited it.
Macke spent his summers with his family in Switzerland at Lake Thun, where he was drawn to the shops in the old town of Thun. Macke’s painting Frau mit Sonnenschirm vor Hutladen was one of these very shops.
Sadly Macke’s career was cut short. On 26th September 1914 he was killed in action during World War 1.
You will need
- 300gsm smooth watercolour paper
- Sharp craft knife, cutting mat and steel ruler
- Sharp Pencil and an eraser
- 2 or 3 water pots
- Size00 acrylic brush with a good point
- Size 0000 acrylic brush with a good point
- Atelier clear painting medium
- Atelier Interactive Acrylics in
- French Ultramarine
- Titanium White
- Burnt Sienna
- Arylamide Yellow Deep
- Arylamide Yellow Light
- Crimson
- Yellow Ochre
- Pthalo Green
- Burnt Umber
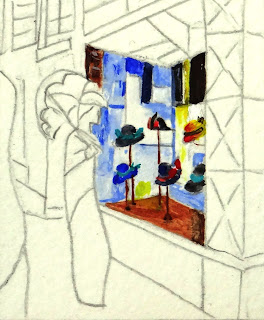
Frau mit Sonnenschirm vor Hutladen, 1914
Macke’s painting Frau mit Sonnenschirm vor Hutladen, 1914, measures 60.5 x 50.5 cm. To find how big yours needs to be simply divide these measurements by the scale you're working in. On a 1:12th scale, dividing by 12 will give us 5.0 x 4.2cm; for 1:16th we need to divide by 16 to get 3.8 x 3.2cm; and for 1:24th divide by 24 giving 2.5 x 2.1cm.
I'm working at a 1:12th scale.
Please note that this is not how Macke would have painted the original - this is a simplified step by step tuturial for you to paint you own version for your miniature collection.
Step 1
Using your steel rule and craft knife, cut out the watercolour paper to the correct size. I recommend adding 5mm all around the edges to allow for framing – you can always trim this off later if your chosen frame does not require the extra allowance.
Divide your canvas into 4 x 4 equally spaced sections (you will need your ruler for this bit). They will not be squares since your canvas is rectangular, but I will call them squares for simplicity’s sake. Please draw your grid lines very faintly so that you don’t need to worry about paint coverage later on.
This is a very geometric painting and although it looks complicated, once you get started it’s not too difficult to draw. Starting in one of the corners, copy the black lines into your chosen square. Methodically moving from one square to its adjoining square, continue to copy the drawing until yours is complete. Do not be tempted to jump around the grid – it is all too easy to make a mistake when counting squares and very frustrating to find that the drawing doesn’t meet in the middle!
When you have finished, erase as many of the grid lines as you can with a soft eraser. Be gentle to avoid damaging the delicate watercolour paper surface.

Step 2
Take a small piece of clear cellophane or acetate and trace over your drawing with a fine pointed marker pen. This will help later on if you paint over your lines – you will be able to place the acetate drawing over your painting to find out where the lines that you have lost should be. I’ve done mine in green to contrast with the predominant blues and reds in the painting.

Step 3
There is a lot of pale blue in this painting. To achieve all the variation we’re going to use a few different strengths of pale blue and a directional blending technique.
To begin with, squirt out a pea sized blob of French Ultramarine into your palette, leave a small gap to the right and then squirt out a pea sized blob of Titanium White. Leave another small gap to the right and squeeze out more Titanium White. Add a touch of the French Ultramarine to the middle white blob and roughly mix. Spread this mix out to fill the gaps, and mix in a touch more of the French Ultramarine at the blue side and mix in more of the Titanium White at the white side.
You should now have a line of blue paint in your palette going from dark to very pale and then white.

Step 4
Roll your size 00 round brush in clear painting medium and pick up some of the second blue in from the left. Roll this on your palette to make your brush come to a very fine point and paint in the vertical line in the back corner of the shop window, followed by the horizontal bottom section of the back wall.
While this is still wet, clean and dry your brush, roll it in medium and then pick up some of the palest blue and roll again. Paint a few gentle lines over the top of the horizontal blue. This will blend in and give the desired almost stripy look.
Add a touch of pure French Ultramarine to the top of the vertical line. The painting medium keeps the paints ‘open’ and blendable for longer, and has the added advantage of thinning the paints without diluting the colour, which makes them much easier to work with on a small scale.

Step 5
Using the same colours and technique, paint the blocks on the left hand wall of the shop window. Use vertical brush strokes and observe the geometric shapes, varying each one in lightness. Notice that within the blocks the colours vary too, in general they are darker at the top and paler at the bottom.

Step 6
Paint the front block of the shop window in Burnt Sienna.
Now mix a touch of Burnt Umber and French Ultramarine and use this to paint the dark sections of the walls of the shop window.
Next glaze over the sections on the back wall with Burnt Sienna mixed with Clear Painting Medium , and brush over the front Burnt Sienna block with a tiny touch of the Burnt Umber/French Ultramarine mix.
Finally, add a couple of brush strokes of Titanium White to the Burnt Sienna block and the bottom of the back corner dark section.

Step 7
Put a brushload of Arylamide Yellow Light on your palette, dilute with Clear Painting Medium and use this to paint the yellow sections of the back wall.
Go over the top yellow section with a very dilute mix of Burnt Umber/French Ultramarine to darken it slightly, making sure that the yellow is dominant. Take some Titanium White and lighten the bottom part of the yellow on the wall.

Step 8
Paint the floor of the shop window in Burnt Sienna.
There is a yellow triangle on the left hand side of the window floor. Glaze this in Arylamide Yellow Light mixed with Clear Painting Medium, then add a small square on the wall above the triangle.
There is a reflection of some sort in the window on the right hand side – paint this in diluted Burnt Umber.

Step 9
Moving on to the hats, paint the bottom left hat in French Ultramarine, leaving space for the ribbon. Ignore the top right hat for now, and paint all of the other hats in French Ultramarine/Burnt Umber mix, remembering to leave the ribbons unpainted.

Step 10
Take a little Pthalo Green and paint the ribbons on three of the hats.
Use Crimson to paint the ribbons on the middle bottom and middle top hats.
Now for the hat we studiously ignored earlier - paint the whole hat in Arylamide Yellow Light, then paint the front of the hat in Crimson, blending the red along the rim towards the back of the hat. Take some Burnt Umber/French Ultramarine mix and paint the ribbon on this hat, and the feather on the middle top hat.
Finally, take Burnt Sienna and paint the second feather on the middle top hat.
To finish off the shop window display, paint the hat stands stems in Burnt Sienna and the bases in Burnt Umber/French Ultramarine.

Step 11
Mix Burnt Sienna and French Ultramarine with Clear Painting Medium to give a soft grey. Using a stripey brush action from the front to the back of the shop, paint the left hand side of the window ceiling. Use Titanium White mixed with Clear Painting Medium to add white to the stripes. Put in a few stripes going the other way using the Burnt Sienna/French Ultramarine.
Next use the same stripey action with French Ultramarine to paint the middle bit of the ceiling followed by white over the top of the blue on the right hand side.
Finally paint in the dark corner of the ceiling using Burnt Umber/French Ultramarine. If you’re going to frame your painting when it’s done, make sure that you paint over the outside edges of your picture – this will make framing easier as you will have some leeway, rather than having a white space around the edges that you have to keep hidden.

Step 12
Moving on to the outside wall of the shop, paint the mid-blues using your strongest French Ultramarine/Titanium White mix from step 3. To get nice sharp lines on your building, use Clear Painting Medium alongside your paint and roll the brush gently on your palette to make it come to a sharp point. Trim any wayward hairs off your brush if necessary. To keep your painted edges crisp, rotate the picture so that you are always painting with your brush pointing into the edges.

Step 13
Now using your next palest blue mix, paint in the majority of the building, just leaving the red sections at the back and the front column unpainted.

Step 14
Pick up some of your palest blue mix and paint the front column. Vary the blues in each triangle to maintain the geometric look. Go back over all of the outside of the building with Titanium White, adding in texture using vertical and horizontal strokes only.

Step 15
Mix 2 parts Crimson with 1 part French Ultramarine and 1 part Burnt Sienna and paint the doorway behind the lady and the windows above the door.
Add more French Ultramarine and paint the shadows in the top of the doorway coming down, and add some texture to the paintwork of the window above the door.

Step 16
Mix French Ultramarine and Burnt Sienna with Clear Painting Medium to give a soft grey with an inky consistency, and use this to outline the edges of the building. Gently tickle over some areas of the blues in the building wall to make it a little dirty, especially at the bottom near the pavement.

Step 17
Now for the pavement. Pick up some of your palest blue and using downward strokes paint the whole of the pavement.
Next pick up some of your next palest blue and paint in the shadows by the wall of the building behind the lady. Drag this downward a little away from the wall.
Add in a shadow in front of the lady.
Use the soft grey (French Ultramarine/Burnt Sienna/Clear Painting Medium) to add more shadows right by the wall, again dragging it downwards a small way from the wall.

Step18
Moving on to the lady, paint the whole of the skirt in Burnt Sienna. Paint the outline of the skirt in Burnt Sienna/French Ultramarine, leaving the section between the knee and the foot without an outline. Draw in the folds of the skirt with Burnt Sienna/French Ultramarine.

Step 19
Paint all of the lady’s jacket in crimson, then add lowlights to the underside of the arm and diagonally across the body in Burnt Sienna mixed with Clear Painting Medium. Add highlights with a weak Titanium White mixed with Clear Painting Medium to the top of the arm and back of the jacket.

Step 20
Mix Arylamide Yellow Light with Titanium White in equal quantities. Split this into three, and add a touch of Crimson to one section and a touch more Crimson to another until you have a pale yellow, a pale peach and a stronger peach.
Paint the underside of the umbrella in the stronger peach at the top moving to the paler peach at the bottom.
Paint the top of the umbrella in pale yellow moving to pale peach towards the lady’s jacket.
Use the pale peach to paint the lady’s face, and then add more colour to her cheek with the stronger peach.

Step 21
Paint the lady’s hair in Burnt Umber with a Burnt Sienna highlight down the middle.
Add a touch of Burnt Sienna to French Ultramarine and use this to paint the hat and the gloved hand holding the umbrella.
Paint the white areas of the hat, jacket collar and sleeve cuff in your palest blue for definition and shadow, and then dot over it in pure Titanium White.

Step 22
Mix Pthalo Green with Titanium White and a touch of Arylamide Yellow Light and paint the bottom of the person on the far left.
Add highlights to the right hand side of the skirts using a pale Pthalo Green/Titanium White mix.
Now paint the long coat in French Ultramarine mixed with a touch of Pthalo Green.
Add Burnt Umber to a little of this mix and paint over the bottom half of the coat, leaving a little highlight at the bottom on the far left.
Add soft white highlights to the top half of the coat along the back by painting a couple of thin lines with Titanium White, cleaning your brush and tickling those lines until they almost disappear.

I cannot see a signature on this piece so I’m calling it done.
If you have a go at any of my painting tutorials I’d love to see your artwork, you can share it here in the comments section of my blog, on my facebook page or email it to me at StephanieGuyFineArt@gmail.com
You can see Frau mit Sonnenschirm vor Hutladen, 1914, at Museum Folkwang in Essen, Germany, and online here
TOP TIPS FOR WORKING WITH ACRYLICS
To make my own stay-wet palette I use a small plastic takeaway box lined with wet kitchen roll on the bottom and greaseproof paper on top. When I leave my paints for any length of time I simply put the lid on and the paints stay workable.
Always store your brushes flat, never resting on their points as this will damage them (either in or out of your water).
Wash your brush in a series of three water pots, beginning in the dirtiest water pot and working towards the cleanest. You should find that this means that your clean water will stay clean for longer, you will need to change water less often and your colours will not get muddy. Dab your brush on an old rag or piece of kitchen towel before picking up fresh paint.
Always wash your brushes before leaving them for any length of time. Dried acrylic is difficult to get out of brushes and will ruin the flexibility and point of your brush.
Tiny brushes can be hard to come by. If you can’t find one small enough, take the smallest brush you can find, fan out the bristles between your finger and thumb and cut out some of the bristles close to, but not right up next to, the ferrule.
If you make a mistake, don’t panic! Either wipe it off with a damp tissue or wait until it is touch dry and paint over it.
If paints in your palette begin to form a film, spray with water.
If your paints feel too thick, you can dilute with a small amount of water or a medium such as Atelier Interactive’s Clear Painting Medium.
If the paint on the brush becomes blobby, clean it and pick up more paint with the tip of the brush.
Remember we’re painting miniatures, you don’t need to squirt out a lot of paint from your tubes, just a pea sized blob at a time will suffice.
No comments:
Post a Comment
Thanks so much for dropping by, I do hope you enjoy reading my blog. Come on in, leave a comment and join the chat!
www.StephanieGuy.folksy.com