
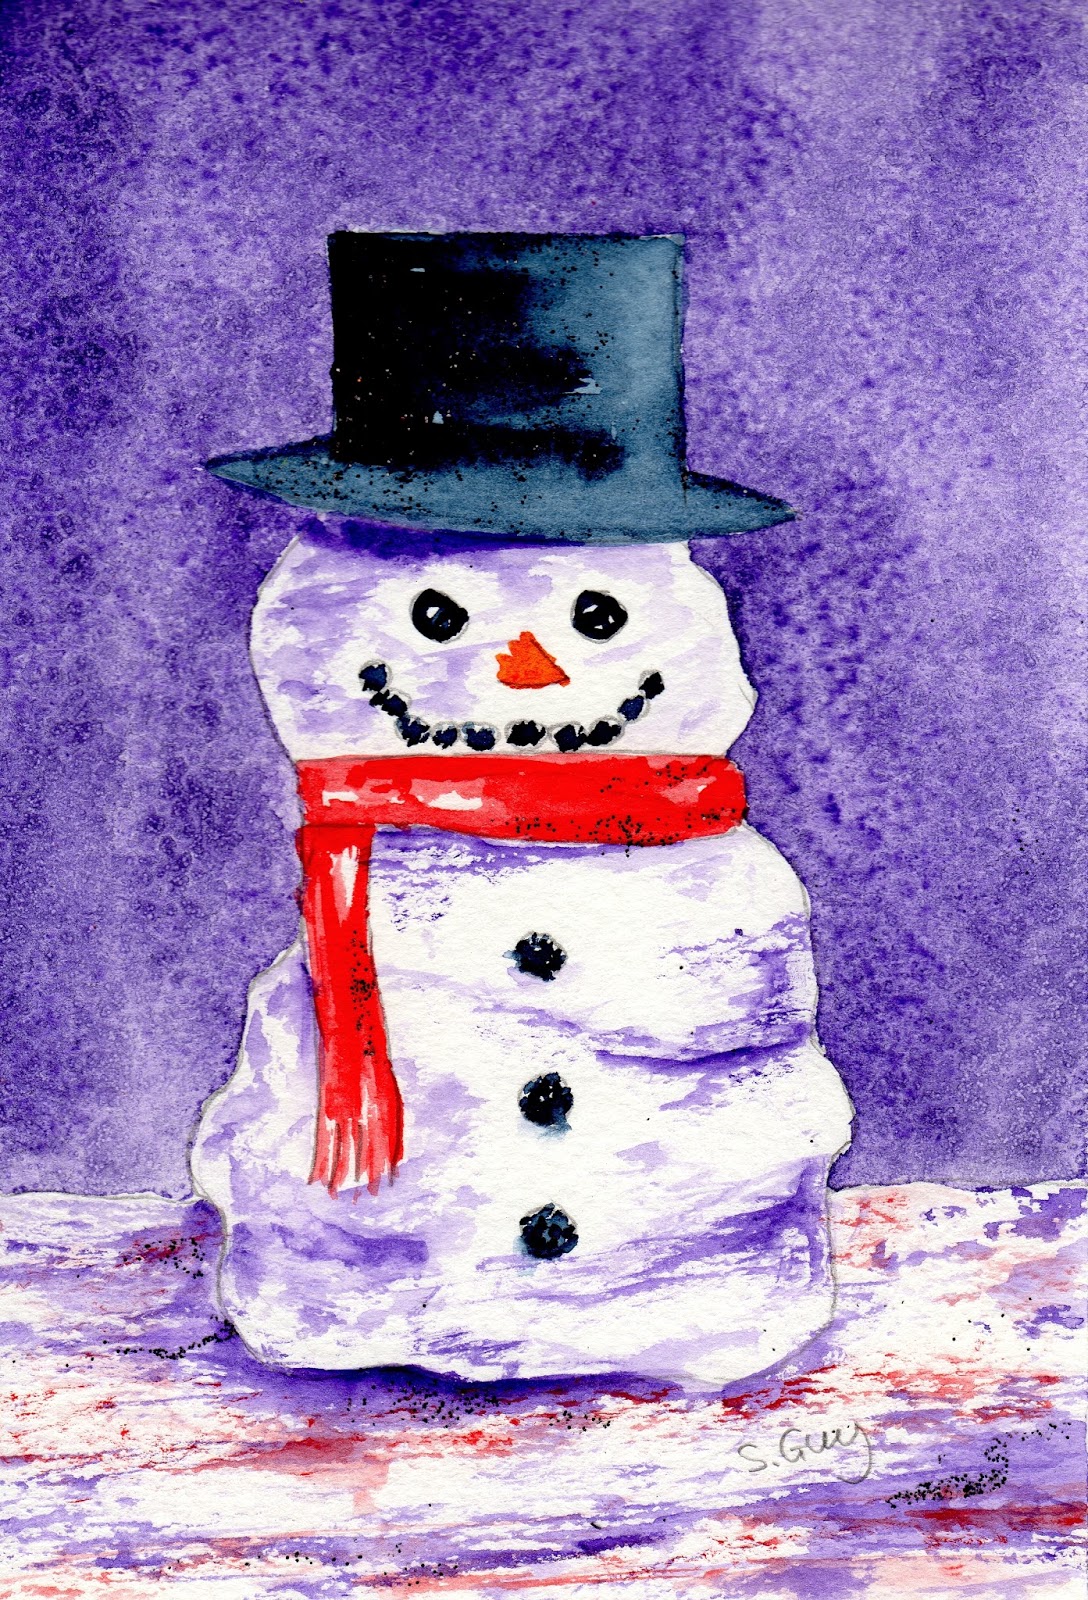
But I can pretend it's snowed and paint the snowman that I might have made, right?
So let's begin.
You'll need- an adult to help you along
- your watercolours,
- some good quality thick watercolour paper
- two round watercolour brushes - one big and one small
- two or three water pots
- a pencil
- a soft rubber
- salt
- fine grade glitter (optional)
You can find my recommendations for paints etc here..
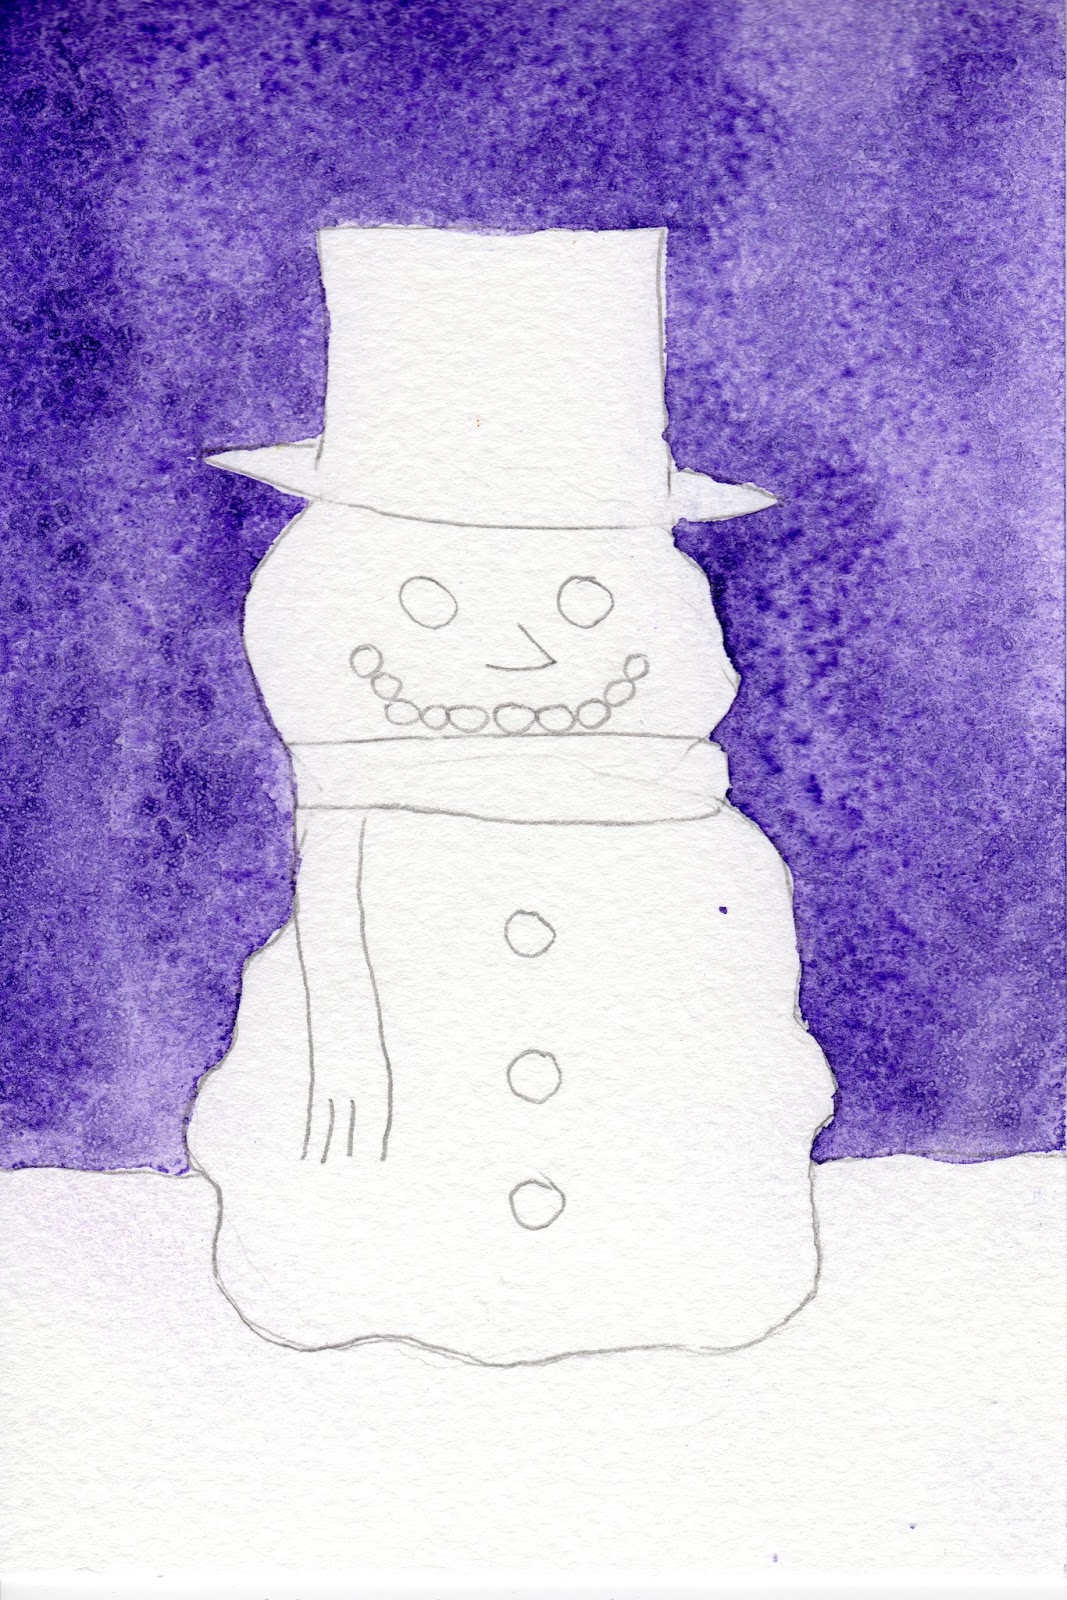
Firstly we need to draw our snowman. Is he round? Well sort of. Snowballs are lumpy and bumpy, and sometimes when the snowman body gets really big, too big to roll, we just pile more snow on.
So draw a lumpy bumpy shape, somewhere between a circle and a square.

Draw another lumpy bumpy shape on top for the head

Now let's give him some clothes. A hat...


Now we'll give him two big eyes, a happy smile made from stones and a carrot nose. Oh and let's give him some buttons too.

Next, draw in the horizon. That's where the land meets the sky.

Before we get our paints out, we just need to rub out the lines that we don't want inside the scarf and the hat. Be gentle with the rubber - you don't want to damage the paper.

Are you happy with your drawing? Your snowman doesn't have to look like mine, you just need to be friends with him or her.
Time to paint
Choose a colour for your sky. I'm going for purple - yours could be blue or pink or red or green, any colour you like! You could even make it stripey or multicoloured if you fancy.
Put a little drop of water on your chosen colour in your palette. This will make it nice and soft for when you're ready to use it.
Next, dip your larger brush into clean water and wet the whole of your sky. Start with the point of your brush touching the line drawing of your snowman, like this:

Put lots of water on so that it doesn't dry out too fast! This is what a brush load looks like on the table...

Can you see the how the paper glistens and shines with the water?

Now twirl your wet brush into the little tray of paint (the tray that holds the paint is called a pan), and place brush onto the paper with the brush pointing to the snowman, just like you did when you put the water on the paper. Watch the paint as it floods out onto your wet paper!

Dip your brush in the water and twirl it in the paint pan again, and paint a bit more sky.
If your paper has dried out, put some more clean water on it and then carry on.

Keep going until all of your sky is done


Now for the magic! Before your paint has dried, sprinkle some salt onto it....


Time to take a break while the salt and paint dry.

Is it dry? I mean really dry? No? Go and do something else for a while!
Is it dry now? Yes? OK, scrape off that salt with your nail. What's that you say? You bit your nails? No, I don't believe it. Well alright then, try using the edge of a spoon instead. Make sure you wash it really well before you use it again.


Let's give our snowman a hat. I'm using a dark blue, you can choose any colour that you like. Paint the whole hat in your chosen colour mixed with quite a bit of water.

Now pick up some more of that same colour but with much less water, so it's a deeper colour, and brush along the left hand edge of the hat.

Before it has dried paint three or four sweeps across the hat from left to right, not quite reaching all the way to the other side.

Now clean your brush and paint the rest of the hat with just plain clean water. Watch the magic happen as the edges blur and merge!

While it's still wet sprinkle the hat with fine glitter...

And the tap the edge paper on your table to tidy it up.

See him glitter and shine!

Lovely!
This next bit needs an almost-dry brush, so give it a wash then dab it on a piece of kitchen towel. Now gently pick up a little of your sky colour across the whole belly of the brush. That's the fat bit. Lay your brush so that the belly is against the paper, on the left hand side towards the bottom, and move it along. You've just made your first shadow on your snowman!

The bristles on your brush might spread out a little, that's OK.

Why did we use the sky colour? Well snow is white, right? And we can't actually see white. What we see are the shadows and reflections cast by the uneven lumps and bumps on the snow. The colour of those shadows and reflections will be whatever colour is around and about - and in this case it's the sky. If there was a big red postbox next to your snowman then you might have some red reflected in the snow too.
Add some shadows to the head...

Now paint some snow shadows on the ground in just the same way. You can add more shadows to your snowman too. Don't be afraid of the dark! Lots of colour is good - just make sure that you leave lots of white snow too.

I'm going to give mine a bright red scarf. Notice how I've left a couple of white bits on the scarf, and some parts are a deeper red than others. This make it look more like a real scarf.
I've also given him an orange carrot nose, with a few tiny red dashes added so that it's not all one colour. Do you have a carrot in your fridge? Go and have a look at it - you'll see that it's all different shades of orange.

Now then. What's missing? Ah yes, the eyes, mouth and button.
Eyes first. Choose a lovely dark colour. I'm using the same dark blue that I used in the hat.
Paint around the edge of each eye, then paint a line across the middle, and a then a dot in the middle of the bottom half of the eye. This gives him a lovely twinkle. If your eyes are both a little different from each other, all the better!


Now to paint all those lumps of coal - each button and that wide wide smile. Build each lump of coal up with little dots. I've shown each stage on the three buttons in the next picture - first paint a few dots, then a few more, then add a tiny bit of water in between the dots to make them blend and blur a little. You'll need quite a small brush!

Finish off all of your lumps of coal, and then if you like add a little more snow shadow underneath them.
Now have a good squint at your painting. If you've used a strong colour in the scarf or hat, you can add some of the same colour to the snow to balance your painting. Mine looks much better with a bit of that bright red in the snow.

Finally, think about whether you want to add more glitter. I think I'm going to put a bit on the scarf and in the snow. My glitter is black so I have to be careful about where it goes! You don't need to use glue for fine glitter, just re-wet your paint on the paper and sprinkle.

And he's done!
If you want your painting to appear in the gallery here, send your photos to me on facebook, by email to StephanieGuyFineArt@gmail.com or tag me on Instagram.
******************************************************************
Snowman Gallery
 |
| By Amelie Age 6 |
 |
| By young friends of Tessa Spanton |
No comments:
Post a Comment
Thanks so much for dropping by, I do hope you enjoy reading my blog. Come on in, leave a comment and join the chat!
www.StephanieGuy.folksy.com